High Dynamic Range (HDR) technology transforms your PC gaming experience. It delivers deeper black levels, brighter highlight details, and a vastly wider color spectrum compared to standard displays. While Windows 11 offers significantly better built-in HDR support than previous operating systems, achieving optimal visual quality requires proper setup and calibration. This guide walks you through every step to set up, calibrate, and optimize HDR gaming on your system.
Essential Requirements for HDR Gaming
Before adjusting system settings, verify that your computer hardware supports full HDR output.
-
HDR-Certified Display: Your monitor needs hardware-level HDR support. Look for VESA DisplayHDR certifications such as DisplayHDR 400, 600, 1000, or OLED panels.
-
Compatible Graphics Card: You need an NVIDIA GeForce GTX 10-series GPU (or newer) or an AMD Radeon RX 400-series GPU (or newer).
-
High-Bandwidth Display Cables: Connect your monitor using at least an HDMI 2.0 cable or a DisplayPort 1.4 cable. Older cables lack the bandwidth necessary to transmit high-resolution HDR video signals simultaneously.
How to Enable HDR in Windows 11 Settings
Activating HDR in Windows 11 requires only a few clicks inside the system menus.
-
Right-click anywhere on your desktop and select Display settings.
-
Select your primary monitor from the display diagram at the top.
-
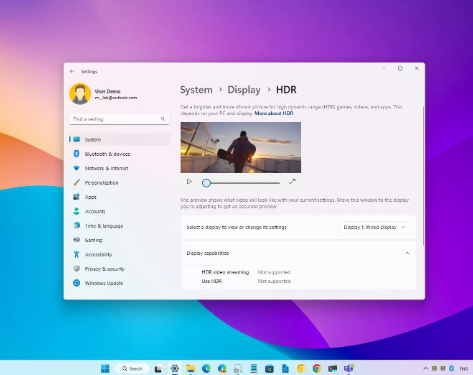
Locate the HDR toggle switch and turn it on.
-
Click on the HDR menu row to open advanced display options.
-
Toggle Auto HDR to On. This feature automatically upgrades older, non-HDR games to display enhanced dynamic range without requiring developer updates.
Quick Shortcut: Press Win + Alt + B on your keyboard at any time to toggle HDR on or off instantly. Your display will flash briefly as it changes signal modes.
Calibrating Your HDR Display
Factory settings rarely output perfect light levels for every gaming environment. Microsoft offers a dedicated calibration utility to solve this problem.
-
Open Settings > System > Display > HDR.
-
Click HDR display calibration to open the official calibration application download page.
-
Install and launch the Windows HDR Calibration app from the Microsoft Store.
-
Follow the step-by-step test patterns shown on your screen.
-
Adjust the luminance sliders until the patterns blend completely into the background for minimum luminance, maximum frame brightness, and peak full-screen brightness.
-
Save your custom color profile when finished.
READ ALSO: Choosing The Right RiiTek Keyboard for Your Set Up
Finding the right wireless RiiTek keyboard transforms how you interact with your home theater PC, Raspberry Pi, or media setup. RiiTek specializes in compact keyboard and touchpad combinations that replace bulky desktop peripherals. This guide breaks down the top RiiTek wireless keyboards so you can pick the best option for your needs.
Optimizing Graphics Card Drivers for HDR Output
Your GPU driver controls how color data travels from your PC to your monitor. You must configure driver-level settings to ensure maximum color depth.
For NVIDIA Graphics Cards
-
Right-click your desktop and open the NVIDIA Control Panel.
-
Expand the Display section on the left sidebar and click Change resolution.
-
Scroll down to section 3 and select Use NVIDIA color settings.
-
Set the output color depth to 10 bpc (bits per channel) or 12 bpc if supported.
-
Change the output color format to RGB.
-
Set the output dynamic range to full.
-
Click Apply at the bottom right.
For AMD Graphics Cards
-
Right-click your desktop and launch AMD Software: Adrenalin Edition.
-
Click the Gear icon in the top right corner and choose the Display tab.
-
Toggle Color Depth to 10 bpc or 12 bpc.
-
Ensure the Pixel Format menu displays RGB 4:4:4 Pixel Format PC Standard (Full RGB).
Fine-Tuning In-Game Display Settings
Many modern games feature dedicated HDR options within their video settings menus. Fine-tuning these parameters yields much sharper highlight details and realistic shadows.
-
Peak Brightness: Match this number to your monitor’s rated peak nits rating (for example, 400, 600, or 1000 nits).
-
Paper White: Adjust this value to control mid-tone luminance, such as user interfaces and text. Set it around 200 nits for dim rooms or higher for bright environments.
-
Color Saturation: Keep this slider near default values to avoid unnatural color distortion.
Frequently Asked Questions About Windows 11 HDR
Can you use HDR on a monitor that lacks native HDR support?
No. Standard dynamic range displays lack the specialized backlight control, local dimming zones, or OLED pixels required to output actual HDR luminance. Enabling HDR on an unsupported display results in washed-out colors and muddy contrast.
Does Auto HDR work in all video games?
Auto HDR works on thousands of DirectX 11 and DirectX 12 titles. However, it does not support older DirectX 9 titles or Vulkan/OpenGL games unless developers patch them.
Why do colors look dull on the desktop when HDR stays enabled?
Windows desktop applications and web browsers use standard sRGB color spaces. When Windows stretches sRGB signals across an HDR color space, colors can appear muted. You can use the Win + Alt + B shortcut to disable HDR during daily desktop work and re-enable it before launching games.
Summary Checklist for Maximum HDR Quality
| Action Step | Target Configuration |
| Cable Connection | DisplayPort 1.4 or HDMI 2.0+ |
| Windows Settings | Toggle HDR On + Auto HDR On |
| Calibration | Complete the Windows HDR Calibration App tool. |
| GPU Color Output | 10 bpc Color Depth + Full RGB Range |
| In-Game Settings | Match Peak Brightness to Monitor Nit Rating |
About the Author