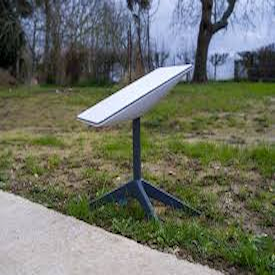
Starlink Mini is a small, lightweight system that fits neatly in a backpack for high-speed, low-latency internet on the go. Over 100 nations and territories are covered by the Starlink satellite internet constellation, which is run by Starlink Services, LLC, a fully owned subsidiary of the US aerospace corporation SpaceX. Additionally, it seeks to offer worldwide mobile broadband.
The Starlink research, development, manufacturing, and orbit control facilities are located at the SpaceX satellite development facility in Redmond, Washington. SpaceX projected in May 2018 that the constellation’s design, construction, and deployment would cost at least $10 billion USD. According to reports, Starlink’s 2022 revenues of $1.4 billion were followed by a net loss; a slight profit was only announced in 2023. In 2024, revenue is anticipated to reach $6.6 billion.
Usage
Unlike the standard kit, whose ideal use is in high-demand everyday internet applications, Star Link recommends that the mini kit would be ideal for basic internet applications.
The mini kit is compact and has low power consumption, hence suitable for potable use.
Accessories
The Starndard kit comes with a wifi router, while the mini kit comes with integrated wifi in addition to a pipe adapter mount designed to attach to any existing pole with a diameter of 31-50 millimeters.
READ ALSO: The top 4 Android emulators for Mac and PC
Starlink mini, Connectivity
Starlink Mini can connect up to 128 devices and covers up to 112 square meters. The standard kit, on the other hand, connects up to 235 devices and covers 297 square miles.
Starlink Mini, Key Features
It is compact and portable
Improved connectivity with phased array antenna
Its integrated router provides up to 112m² of coverage area
IP67 dust and water resistance
User-friendly setup via mobile app
Wirelessly connect up to 128 devices
Inside the Starlink Mini Box
Starlink
Kickstand
Pipe Adapter
DC Power Cable is about 15 meters.
Power Supply
Starlink Plug
Inside the Standard Kit Box
Starlink
Kickstand
Gen 3 Router
Starlink Cable (15 m)
AC Cable (1.5 m)
Power Supply
Starlink Mini vs. Standard Kit, Performance.
They both offer 25–220 Mbps download speeds and 5–20 Mbps upload speeds. They have a latency of 25-60 ms.
Starlink mini, Color
All the Starlink packages are currently gray in color.
Star Link Mini Vs Standard, Power Consumption.
The standard kit consumes more power than the mini kit. It has a 75-100w power rating, while the mini kit has a 25-40w power rating.
Star Link Installation Manual
With everything you need to connect to the internet in a matter of minutes, Starlink is made to be self-installable.
For your Starlink to maintain communication with satellites as they pass overhead, it must have a good view of the sky. Service disruptions will result from obstructions like a tree limb, pole, or roof that block the connection between your Starlink and the satellite.
1. Get the Starlink app.
To begin the installation procedure, download the Starlink App and scan the QR code included on the kit package.
2. Locate a spot with a Clear Sky View and Look for Any Obstacles
For your Starlink to maintain communication with satellites as they pass overhead, it must have a good view of the sky. Service disruptions will result from obstructions like a tree limb, pole, or roof that block the connection between your Starlink and the satellite. Make sure you have chosen a good mounting place by using the app’s blockage tool.
Consider putting in an elevated area, such as a wall, pole, or roof, if you were unable to locate a clear field of vision from the ground level. Additional mounts and accessories may be purchased on the Starlink Shop, and the package includes a pipe adapter mount.
3. Connect the Starlink to a power source
Because the Starlink Mini features an inbuilt WiFi router, you may connect to the internet without a second router. Plug one end of the included cable into your Starlink after raising the kickstand. Make sure the plug face is flat with the surface once it has been fully inserted.
Plug the power cord into a power outlet and route the other end to your power supply.
4. Establish a WiFi connection
a. Locate and join the STARLINK network in your device’s WiFi settings.
b. To make your Starlink WiFi network safe, rename it and set a WiFi password using the Starlink App. Go to Settings > Router in the Starlink App, type in the name and password of the WiFi network you want, and then click Save.
Although it is not required, we advise protecting your WiFi network.
c. You’re connected now! To verify your connection, adjust other settings, and more, use the Starlink App.
5. Set up Starlink For the strongest connection, your Starlink Kit must be pointing in the correct direction to connect to as many satellites as possible. Use the kickstand to tilt the kit while setting up Starlink, or, if you have a pipe for installation, use the included pipe adapter mount.
The app will not notify you whether your Starlink is correctly aligned if it is within 5° of the center.
Multiple Starlinks: Three meters should be the minimum distance between the mount center and any other Starlinks that are being installed in the same area. The Starlinks may be connected to a single network using a third-party router, which also offers additional features like failover, traffic shaping, and load balancing.
Find the reset icon on the back to factory reset the Starlink. Hold down firmly for three seconds after hearing or feeling a click. When finished, the LED will immediately flicker and turn off. To configure your Mini and connect to the internet, follow the installation instructions.
Keep in mind that after a factory reset, your network name and password will be changed. During setup, look for the “Starlink” network and set up your network using the name and password of your choice.


